I tried something that I learned by reading a conversation on Twitter this summer. I would only be guessing at who was having this conversation, so if you read this and it sounds familiar, let me know so I can give you credit. Anyway, the conversation was about tests and retesting.
What I found interesting was the idea of retaking the test as a group the day after they take the test individually. The group has limited time, say 15-20 minutes, to complete the test. I tried this with our first skill quiz in Algebra this year.
My reasons for trying it were to:
1) help students see that they are not the only ones with a question,
2) allow peers to work together and think through the quiz,
3) to give me and opportunity to listen to how students were explaining the math to each other, and
4) to make sure that everyone had a copy of the quiz in their math binders with the problems worked out (some students will never bring back the signed test to put in their binder).
I have two completely different groups. My first group is a higher ability group that doesn't enjoy being quiet and still for more than 10 seconds. This has been a challenging group so far. My other group is quieter, but as a group, they struggle a little more to understand the material. They present a different type of challenge.
I say this because there were two different outcomes for this activity. In my first group, I walked away feeling "meh" about the process. It took a lot of work to get them started and on task, even with regrouping them so that students that did well were placed with students who didn't. They were also more argumentative with each other in a nonproductive way. I struggled to convince them of the value of their work. We will try this again on another quiz/test, but I am thinking to take it another way. I am thinking of making it an error analysis activity and using mistakes that students actually made on the test.
My second group had a totally different experience. They got right to work, helped each other, and talked about the questions. I heard thinks like "I thought you had to..." and "But why wouldn't you..." while they were working with each other. This was completely beneficial for them. I also was able to answer questions that stumped the entire group, which made for a great dialog between the students and I. I felt like this group walked away with understanding of what they did wrong and what still needed more practice. It was a good use of time and we will try it again in the same way.
In sharing this technique, others thought that I should do this before the quiz/test. I don't think that it is a bad idea by any means, however I have two concerns. My first concern is that the only way that they will review for the test, will be the group test. I want them to know how to study for math without me giving them questions. The second concern that I have is that the questions are standards based and more open ended. I am a novice at writing questions this way and am just not confident I can write three or four questions that I really like, so I can do a practice test, test, and re-test. I'm not ruling it out, but I'm just not ready to go there, yet.

Showing posts with label Activity. Show all posts
Showing posts with label Activity. Show all posts
Saturday, September 20, 2014
Monday, August 18, 2014
Integer Word Problem Practice with My Twist
I have been procrastinating by digging through my folder on my desktop labeled, "7th Grade Math". Clever, huh? I came across some integer problems in there that had a lot of promise as in-class practice. It was a freebie that I had downloaded awhile back and it took a little research to find the author. Anyway, I found that it came from Lisa at Teacher's Notebook. I really liked the problems that were on the worksheet, but I was bummed that it was a worksheet. There had to be a way to rework it, so that it would be more intriguing to my middle school kiddos.
I started thinking about the old game show from the 80s, "Classic Concentration". If you haven't seen the show, contestants make matches on the game board to
win prizes and slowly uncover a puzzle. The person who solved it got a
bigger prize. (See sample to the left)
Since the worksheets eventually lead students to do a coloring sheet, I thought that maybe I could use the idea of uncovering a puzzle.

The first thing that I did was take the answer sheet and resize it to be 20 cm by 25 cm. I then printed it out and glued it to a piece of card stock.

Next, I made a 5 x 4 grid. Then I wrote the 12 correct answers in the boxes and 8 incorrect answers. All of the solutions and incorrect solutions came from the answer key.

Then I cut it apart into 25 separate squares.
So this is the starting point of the activity. I have the template for the answer sheet that students fill in at the end of this post. The basic idea is that students would start like the above picture. As they solve a problem, they will look at the board and then flip over the piece with their answer. If they don't see their answer, they will need to check their work for errors.

As students continue to solve problems and flip over pieces, they will start to see the pieces of the answer sheet in the incorrect order.
Students will also realize that there are 8 unused answers. Students will be asked to write a question/problem that has the unused answers as an answer.

After the questions/problems are written, all of the pieces can be flipped over. Students then have the job of getting the pieces into the correct order and making the picture.

The students' pictures will look like this when they are finished!
OK, so it's not exactly "Classic Concentration". While making this activity though, I did have a few thoughts about how to make another activity that would resemble the actual game more. I'm working on that one!
Here is the answer template that the students will be completing during the activity. Before the activity, I would type in the questions from Lisa's worksheet or I am thinking to change "Problem" to be "Important information to solve the problem". Then, I could just pass out the questions or put them on index cards.
 |
| photo credit: www.ew.com |
Since the worksheets eventually lead students to do a coloring sheet, I thought that maybe I could use the idea of uncovering a puzzle.
The first thing that I did was take the answer sheet and resize it to be 20 cm by 25 cm. I then printed it out and glued it to a piece of card stock.
Next, I made a 5 x 4 grid. Then I wrote the 12 correct answers in the boxes and 8 incorrect answers. All of the solutions and incorrect solutions came from the answer key.
Then I cut it apart into 25 separate squares.
So this is the starting point of the activity. I have the template for the answer sheet that students fill in at the end of this post. The basic idea is that students would start like the above picture. As they solve a problem, they will look at the board and then flip over the piece with their answer. If they don't see their answer, they will need to check their work for errors.
As students continue to solve problems and flip over pieces, they will start to see the pieces of the answer sheet in the incorrect order.
Students will also realize that there are 8 unused answers. Students will be asked to write a question/problem that has the unused answers as an answer.
After the questions/problems are written, all of the pieces can be flipped over. Students then have the job of getting the pieces into the correct order and making the picture.
The students' pictures will look like this when they are finished!
OK, so it's not exactly "Classic Concentration". While making this activity though, I did have a few thoughts about how to make another activity that would resemble the actual game more. I'm working on that one!
Here is the answer template that the students will be completing during the activity. Before the activity, I would type in the questions from Lisa's worksheet or I am thinking to change "Problem" to be "Important information to solve the problem". Then, I could just pass out the questions or put them on index cards.
Monday, August 11, 2014
First Page of This Year's INB!
Now that there are only two weeks until teachers have to report, I have officially decided that it is time for me to begin panicking and get some stuff started and other stuff finished. I started to put together my INB for my algebra class. I only have a very rough start and will share when I get a few more things in it. Some foldables are still in prototype phase and all the kinks are still being worked out of them! :)
I did however get the first page finished and I am really excited about it. I originally decided that I would have the first page of the students notebooks be a "Math about Me" page and I went to my trusty friend, Google, to find some images for inspiration. Most of the ones I had seen were for elementary grades. Then I came across this one that was posted on "Shut the Door and Teach".
I really liked that the students made expressions that went with the numbers that were about them. I really loved that it connected to our second topic of the year – order of operations! I am still working the plan out, but I think we can spend some time double checking each others' "Figure Me Out" page as a warm-up or practice activity.
The example above was for fourth grade, so I needed to put some guidelines in place for my middle school students. In the directions, I said that they needed to use fractions, parentheses, exponents, square roots, etc. to write their expressions. The expressions had to be at least 3 terms as well, to stop 9 + 1 being the expression for 10. I also hope that my example will inspire them to be tricky and challenging. Here is what I did:

I did however get the first page finished and I am really excited about it. I originally decided that I would have the first page of the students notebooks be a "Math about Me" page and I went to my trusty friend, Google, to find some images for inspiration. Most of the ones I had seen were for elementary grades. Then I came across this one that was posted on "Shut the Door and Teach".
 |
| Template available at TPT. |
The example above was for fourth grade, so I needed to put some guidelines in place for my middle school students. In the directions, I said that they needed to use fractions, parentheses, exponents, square roots, etc. to write their expressions. The expressions had to be at least 3 terms as well, to stop 9 + 1 being the expression for 10. I also hope that my example will inspire them to be tricky and challenging. Here is what I did:
I will fill in my self portrait by the time that the kiddos see it. I also forgot to use a square root somewhere, so I have to fix a sticky note! The answers are under the sticky notes, so after the students evaluate the expression they can check and see if they are right. I think it is an easy entry point for students to get back into the groove of math.
Update (8/19/14): I didn't realize that the author of Shut the Door and Teach had a template available on her TPT store. Due to copyright, I can't keep the template I formatted to fit in my INB available for free download.
Saturday, August 9, 2014
Tellagami for Vocabulary...I'm Still Unsure

When I first saw it, I thought what a cool idea for getting students to show multiple representations of the same vocabulary word. After closer inspection, I realized that the students were actually showing how to solve the problem. I thought this is brilliant and totally motivating for middle school kiddos.
Since I had never heard of Tellagami, I downloaded the free version from the app store on iTunes to my phone. I played with it a little bit and it is pretty simple and students would figure it out quickly. It's nice from the standpoint that there are a limited number of choices that the students can pick, so they can't spend hours picking the outfits and hairstyles and then never get to the math. There is the option to type in the text and let a computer voice say it or you can record your own voice.
I have finally made my first gami about slope. To start, I made up some cards about slope. I opened the app and selected the background, then took a picture of my cards with the little person on the screen. Then I recorded a little something about slope. It was really that simple.
 |
| To hear it play, click here |
But, there are some downsides to this app that I found as I played:
1) There are in-app purchases (boo!).
2) There is a limited trial time to access everything. After that you are left with one type of clothing which you can change the color of the shirt/pant. That doesn't bother me. Losing the ability to type what the character should say and then pick a voice is a bummer for me. I don't want to pay for it.
3) There is the cost for the educational version of the app. The cost is $4.99/subscription. The up-side is that there are no in-app purchases. It's just a bit too much to ask my school to pay at this time.
4) Because of the in-app purchases, I can't have students use their phones to produce a Tellagami.
5) Students are limited in the free version to 30 seconds. I believe it is reasonable for a vocabulary word, but might not work to explain a problem.
6) There just isn't an easy way to collect them and put them into a file for later that I can figure out. The email depended on the email entered into the device. We can't use Facebook or Twitter for good reason from our school devices. The only other option to share is via text. That is how I was able to link my screen shot to the gami that was made. So, timing is vital if students create these. We need to share them during the same class period. Or, one day is for planning and another day is for recording/sharing.
I know that my students would love it. But I am not sure after playing with it. So I started thinking of alternatives. Since my students enjoy making videos, we could do it without the Tellagami app and just record a video and save it to Google drive. We would loose the computer animated person though and I know that would be novel and intriging. They could make their own figure and insert it into the video. Ultimately, the idea that Matt wrote about on his blog can be adapted.
I am putting this out there, hoping, that maybe there is someone wiser than I, who can tell me other options to work around the downsides of the app. Does anyone use Tellagami (or something similar) in their classroom? What do you do with it? Love to hear about it!
Tuesday, August 5, 2014
Ratio Fill Up (Ratio/Fraction Equivalences)
Here is another game from TMC14. This is the game that my group worked on so I can take some credit in it's creation. My group's goal was to create a game about ratios/proportions. We were thinking of ratio tables and wanting students to see that each ratio was equal to the other. There are quite a few rules to this game as you can see. I took the rules straight off of the TMC14 wiki.
Objective: To earn three points [counters] by filling ratio tables with congruent ratios.
Materials: Gameboard with 4 ratios tables with room for 5 ratios in each table, ratio cards, point counters, calculator.
Set-up: Shuffle ratio cards and deal 5 to each player.
Game play:
1) The first player plays any ratio card from their hand in the blank first space in a ratio table and then draws a card to end his/her turn.
2) The second player can either play an equivalent ratio in the same table as the first player or play a different ratio in one of the empty tables.
3) Play continues with each player playing equivalent ratios to fill up the ratio tables and drawing cards to replace the ratios just played.
4) When a ratio table gets full, whoever played the last ratio into that table gets 1 point, as long as they can identify operations to get from the first ratio played to the last (ie, if the first ratio is 2/8 and the last is 4/16, they could say multiply by 2/2 or divide by 2/2 and multiply by 4/4).
5) The player to the right of the player that played the last ratio will take the calculator and divide out the ratios in order to check to make sure the ratios are all equivalent.
6) Cards from the completed ratio table are put into the discard pile, and the cleared ratio table is open for any player to play in.
7) The first player to 3 points (counters) is the winner.
Other rules:
1) If the draw pile ever runs out, reshuffle the discard pile to create a new draw pile.
2) If a card is played incorrectly the player that noticed the error draws an extra card and the incorrect card is put into the discard pile.
3) Skips, reverses and wilds:
OK, this is a lot of rules! Our group did agree that the game still needed some tweaking, but we just ran out of time. Also, I am not so sure about the 4th rule. I'm having trouble seeing the value in doing that. Maybe when I play it with students I will, but right now I am struggling. I would rather have my students identify the pattern in the ratio table and figure out how to do that considering that the ratios are not placed in any specific order during play. What strategy would they use to figure out that there is a scale factor of 2/2? What discussions or debates would come out of this? Sometimes the first and last ratios played don't display an easily identifiable pattern and for the lower students, this could cause frustration. I'll just have to play it and see.
Another thing that I did to modify this was to add labels to the ratio table. I just felt like if students saw the labels they would not be thinking fractions. The Power Point below is completely editable, so if you would like to remove those or change them, it is possible.
Below you will find the gameboard and cards that I made up to use with my students. The cards are ment to be cut out like fractions. A more challenging option would be to cut the individual numbers apart and have the students work together to make ratio tables that are true and to explain how they know they are correct. There is definitely room for tweaking and developing spin-offs of the basic game.
If you play this with students and make modifications, I would love to hear what you did and how it worked for you!
Objective: To earn three points [counters] by filling ratio tables with congruent ratios.
Materials: Gameboard with 4 ratios tables with room for 5 ratios in each table, ratio cards, point counters, calculator.
Set-up: Shuffle ratio cards and deal 5 to each player.
Game play:
1) The first player plays any ratio card from their hand in the blank first space in a ratio table and then draws a card to end his/her turn.
2) The second player can either play an equivalent ratio in the same table as the first player or play a different ratio in one of the empty tables.
3) Play continues with each player playing equivalent ratios to fill up the ratio tables and drawing cards to replace the ratios just played.
4) When a ratio table gets full, whoever played the last ratio into that table gets 1 point, as long as they can identify operations to get from the first ratio played to the last (ie, if the first ratio is 2/8 and the last is 4/16, they could say multiply by 2/2 or divide by 2/2 and multiply by 4/4).
5) The player to the right of the player that played the last ratio will take the calculator and divide out the ratios in order to check to make sure the ratios are all equivalent.
6) Cards from the completed ratio table are put into the discard pile, and the cleared ratio table is open for any player to play in.
7) The first player to 3 points (counters) is the winner.
Other rules:
1) If the draw pile ever runs out, reshuffle the discard pile to create a new draw pile.
2) If a card is played incorrectly the player that noticed the error draws an extra card and the incorrect card is put into the discard pile.
3) Skips, reverses and wilds:
- Skips automatically skip the next player,
- Reverses switch which order the players play (so, if play is going left at first, it instead goes right), and
- wilds can be played in any ratio table that already has a ratio in it, but the player who plays it must name an equivalent ratio that isn't already in the table.
OK, this is a lot of rules! Our group did agree that the game still needed some tweaking, but we just ran out of time. Also, I am not so sure about the 4th rule. I'm having trouble seeing the value in doing that. Maybe when I play it with students I will, but right now I am struggling. I would rather have my students identify the pattern in the ratio table and figure out how to do that considering that the ratios are not placed in any specific order during play. What strategy would they use to figure out that there is a scale factor of 2/2? What discussions or debates would come out of this? Sometimes the first and last ratios played don't display an easily identifiable pattern and for the lower students, this could cause frustration. I'll just have to play it and see.
Another thing that I did to modify this was to add labels to the ratio table. I just felt like if students saw the labels they would not be thinking fractions. The Power Point below is completely editable, so if you would like to remove those or change them, it is possible.
Below you will find the gameboard and cards that I made up to use with my students. The cards are ment to be cut out like fractions. A more challenging option would be to cut the individual numbers apart and have the students work together to make ratio tables that are true and to explain how they know they are correct. There is definitely room for tweaking and developing spin-offs of the basic game.
If you play this with students and make modifications, I would love to hear what you did and how it worked for you!
Monday, August 4, 2014
My Closest Neighbor (Estimating with Fractions)
I like games in the classroom, so this intrigued me. We started by playing games and reflecting on their value in that classroom and how we could not only use what we played, but how we could structure time for the games. I particularly liked the game Swish. Here is a video if you haven't heard of the game before. It is easier to watch than for me to explain.
I liked that Swish gave students practice working with transformations without them having to have been formally introduced to them. It was also easy to create levels of skill by telling students they could only win cards if they could do it in 2,3, 4, 5, etc. moves. More moves means more cards, but ups the difficulty level.
After playing the games, we spent the next two days developing and playing the games we created. If you would like to see all of the games that were created click here to go to the middle school page of the TMC14 wiki.

After every player has 5 cards, we set a goal. We decided that the player closest to 1/2 would win the round. To not have fights among students, I made cards for them to flip over and make their goal for that round.

Since 3/8 is closer, I would choose to play that and hope that I would win. Now, imagine the discussion that would happen and the proof that the students would have to have if another student put down 3/7. Which is closer? How do we know for sure? How can we prove it? These are great questions for mathematical thinking and great opportunity to do informal proof and debate in the math classroom.
Now what is pictured here would not work for closest to 1/2 because 2/4 is exactly 1/2 and that isn't what the card said. This is a great chance for students to identify equivalent fractions as well.

I didn't develop this game. It came from another group's game fraction war. As we were rotating and playing each others' games, my group mate Justin thought it would be an interesting twist to try to get the closest fraction to a certain value. We played a few rounds like that and the discussion about what was close or that exact didn't win was valuable and worth time in my classroom next year.
All that I can take credit for is giving it a new name, "My Closest Neighbor" and making the cards on the Power Point presentation below. I left this editable. Depending on how good my kiddos get at this, I may need to add 6/7 or 1.2 to the mix. I do think some decimals would be good for them to think of equivalencies and conversions.
I am looking forward to trying this with my kiddos in the fall. My seventh graders should enjoy it!
Thursday, July 31, 2014
Frog, Log, and the Questions that Ensue...
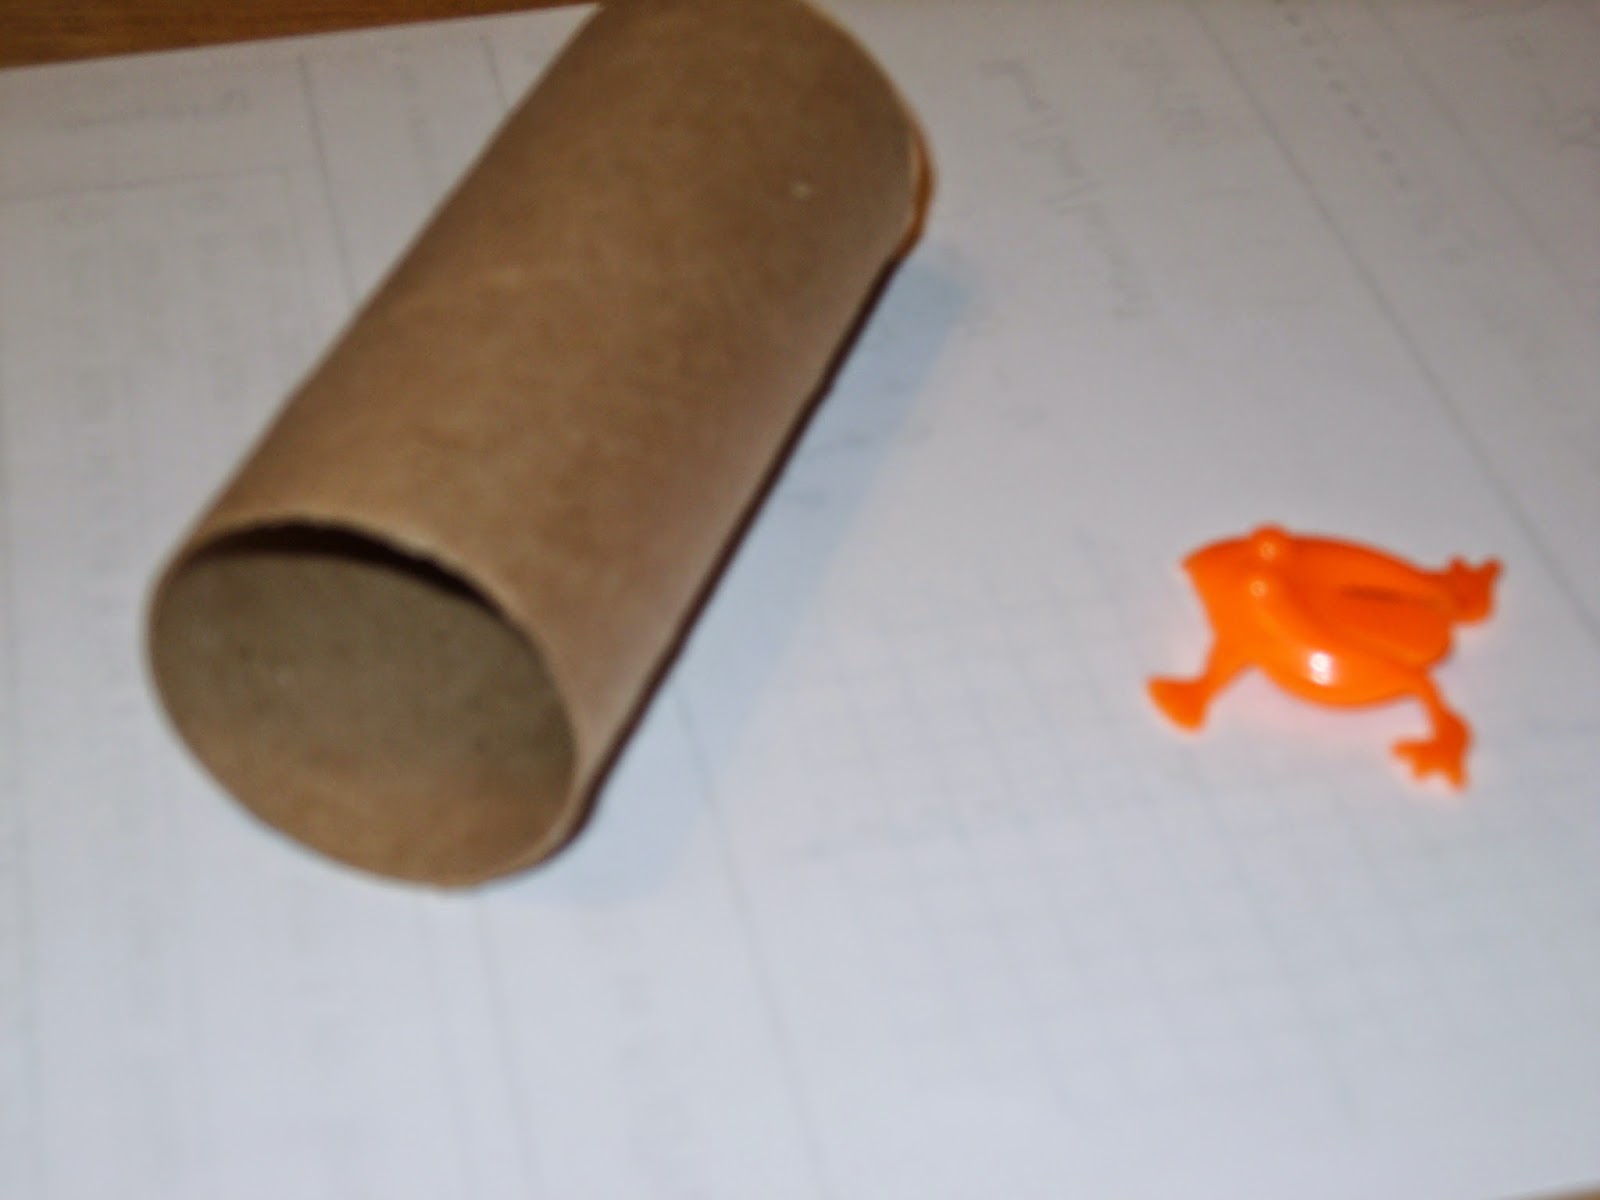
Anyway, I started playing with the flippy frog instead of working diligently. I then started wondering if the frog could make it over the toilet paper tube. I thought it was a solid experiment and worthy of exploring. So, I did.

What I noticed was that sometimes, he didn't make it over the log.

Yet, other times he would make it.
Now, I realize that it doesn't take any great skill to know that this would happen. It fact, a small child probably could have told me what would happen. I started wondering if the frog was more likely to make it over the log (aka toilet paper tube) or not to make it. I hypothesized that it would be an equally likely chance that the frog would make it over the log. Well.. at least theoretically, it should. The operator plays a huge role in changing the chance of the frog making it over the log. My frog failed to make it over the log the majority of the time.
I could use this idea for a demonstration of theoretical v. experimental probability, but I wanted more to the lesson. So that led me to the question, at what distance is it improbable that the frog will make it over the log? At what distance is it almost certain that the frog will make it over the log? What then is everything in between those two distances? Are they all capable of producing the same probability? Where does it change?

I feel like my students could determine a distance where it is improbable that the frog will make it over the log and where it was almost certain. I'm not sure that the data in between those points can be determined as easily without quite a bit of experimentation and data collection. There is nothing wrong with doing that, but I am wondering if it is an activity that will be valuable for the time that it would take. I was playing for over an hour. I know that we could do some group collection of data and analyze that. There would be value in doing noticing and wondering.
I am feeling unsatisfied by the results though, and it bothers me. Maybe because it seems that there should be a simple answer. However, maybe I am looking for a simple answer when their isn't one. There is even the possibility that the experiment doesn't support what I want to know and I need to revise. I'll have to keep thinking. Data and probability won't be until mid-year. Plenty of time to develop, modify, or throw out this idea.
If anyone has any thoughts on any of the questions that I posed, I'd be open to hearing your thoughts. I will be thinking about this some more. If I develop this farther, I will post what I did and anything that I used to guide the students.
Friday, July 18, 2014
Out With The Old...
Well, I finally decided that I am going to remove the problem solving category from my grade book. That isn't as horrifying as it sounds. For many, many years, I have been giving students problems that would stretch them and get them to think a bit more creatively. This was to be done independently of class time. Some years, it has worked brilliantly and other years it hasn't been as successful. I just feel like this has run it's course and is time to try something new.
As my classroom transitions next year to a blended and then flipped classroom, I am realizing that I will need to differentiate much more than I am currently doing. I also need established tasks for independent work time or for fast finishers. What I have done in the past just won't cut it for next year. I have also been reading a lot about standards based grading and I am realizing that I have a great opportunity to replace something that needs to be gone with something that can tell me more about my students understanding.
The one hurdle I kept running into was the book. Saxon isn't totally designed for how my train of thought was going. As I was flipping through the teacher pages, that I've never really read, I found a list of lesson by topic. As I examined the list, I decided to go rogue and not follow Saxon lesson by lesson. I know it isn't recommended, and yes, I may regret this, but it is worth a shot right now. So I am offering my apologies to all of the Saxon Algebra I users who are yelling at me as they read this.
The beauty of freeing myself from following lesson by lesson was that I was able to create. I started looking through an old Transition Math and CPM Foundations of Algebra, Year I textbook that I had and found some inspiration. I put some twists on a few of the ideas to match the standards I was teaching. Once the creative juices were flowing, I was getting more and more excited about what was appearing on the paper before me.
Here is what I created. I am excited to use these in place of the problem solving I have been doing. I am hoping for a richer experience for my students and myself!
Saturday, July 12, 2014
What's My Function?
 |
| The bottom x value is a 3. It isn't very clear. |
 A few years I switched schools and in that move, lots of stuff ended up in my office area at home while it waited to go to it's new home in my new classroom. Well, some of it never made it and after looking at it for the past 3 summers, I finally decided that it was time to dig through what was in the boxes and start organizing or throwing.
Here is a little gem that I came across in the files. Writing the function rule from a table was a challenge for this particular class, so I had them make these cards. Everyday, a new student posted their function table and the class worked to figure out the rule. We then posted it for students to use for review on their own. It was great practice, but it took a lot of time! I think that is why is is still sitting in the file because it would impossible that I just forgot about it! : )
I started thinking about this because I liked the premise of what I did. So I came up with two alternatives to use instead.
1) Students would find a new partner each day and practice finding the function rule of their partner's card. It would allow the opportunity for the students to practice coaching. Also, it gives them an opportunity to explain their thinking and get clarification from a peer if needed.
2) Students could put the same information onto an index card. They could do a mix 'n' match with them. I could collect the cards and redistribute everyday and do a quick 5 minute review. The index cards could also go into a station activity at a later time.
There are probably more ways to use this that my summer brain isn't coming up with yet. Does anyone else have an idea of how to use this in the classroom?
Wednesday, July 9, 2014
Algebra Zoo
 |
| It's hard to see on the picture, but the fish are Cs. |
The "Algebra Zoo" goes back to my eighth grade algebra teacher, Mrs. Ryan. Mrs. Ryan was from Ireland and she had red hair, an Irish accent, and told fabulous stories. I really liked her because she had silly stories that helped me remember important ideas in math.
Mrs. Ryan asked us one day, "What is a zoo like?" and we said the normal things like a lion, bear, giraffe, cages, animal shows, etc. She then asked "What animals are put in each cage?" She then went on to ask something like, "Why wouldn't you put the lions and gazelles together?" and the obvious answer was that the lion would kill the gazelle.
 |
| The dolphin forms a U! |
She did stress that x and 5x were the same creature, but they looked different. They were special and lived peacefully in the same cage.
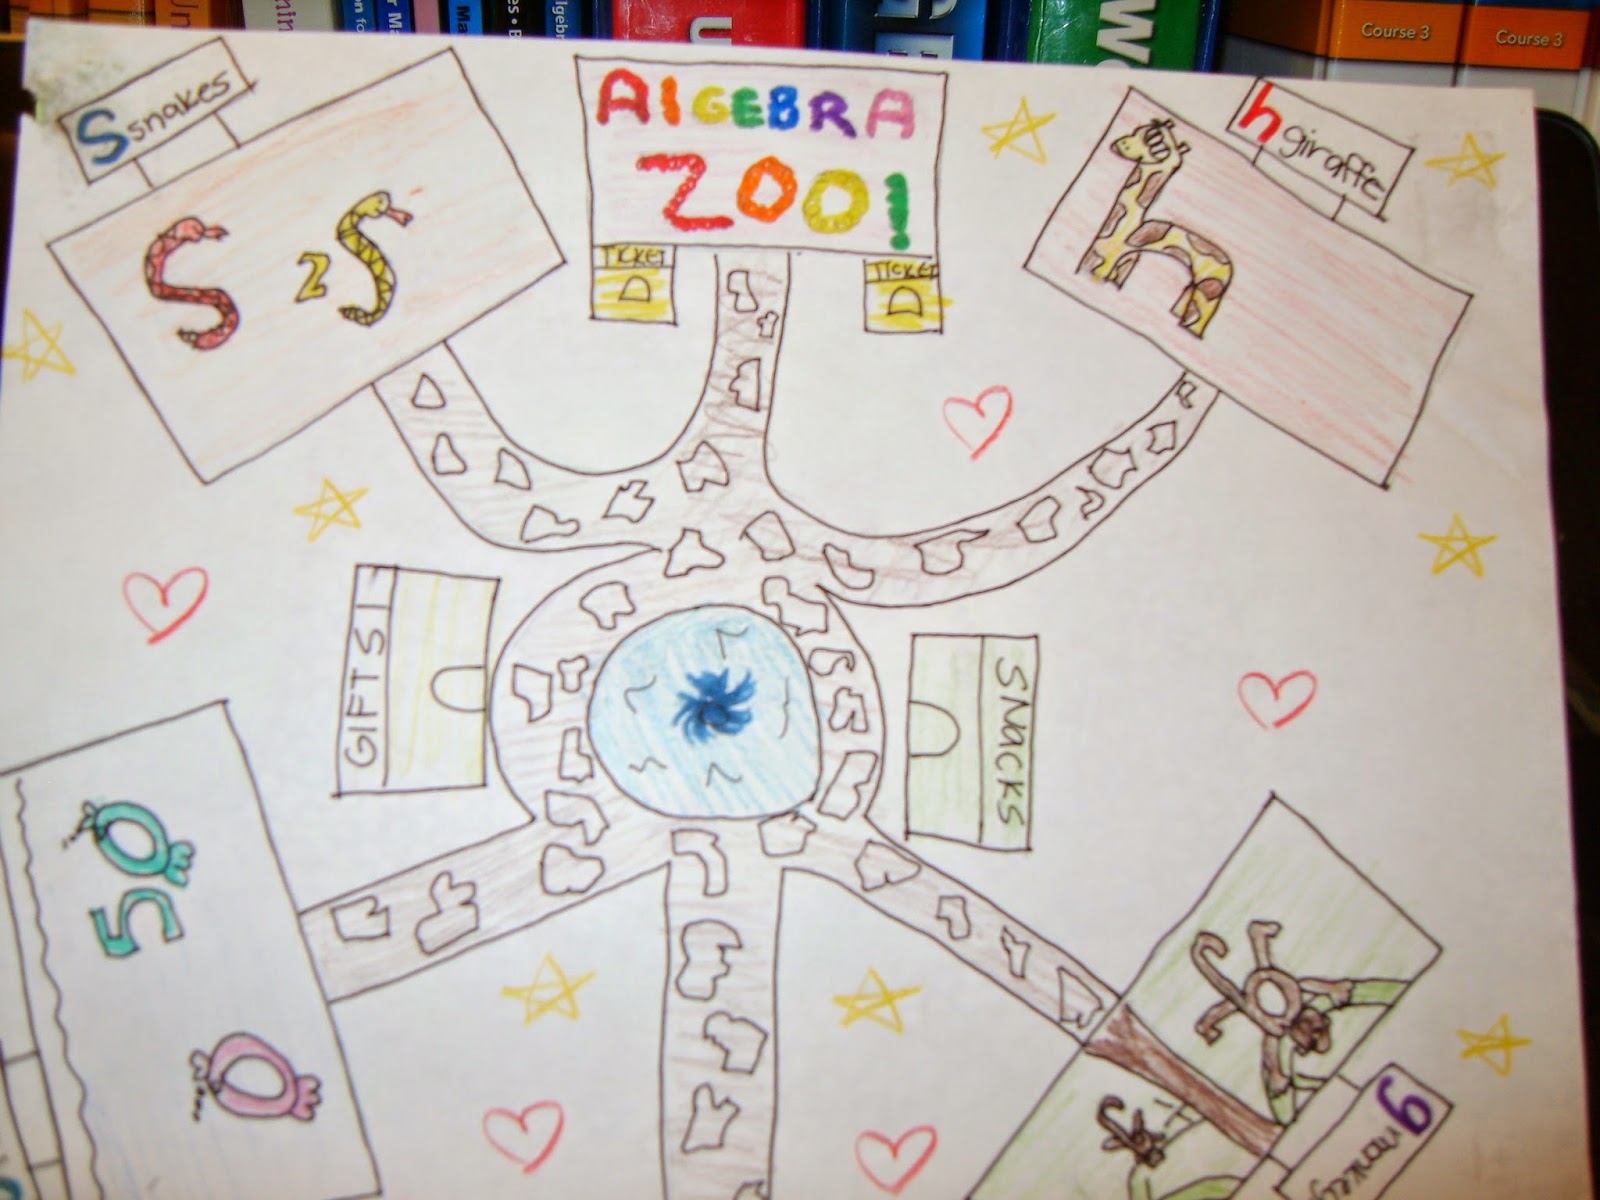 |
| I love that the monkeys are Gs! |
That idea has stuck with me since 8th grade and I have told that story, or at least some version of it, to many students. I have only been having students make pictures that we display as a reminder for the past few years. It is silly but it really does help some students.
When I give this assignment, I ask the students to be creative. I ask them to try and make their animals look like the variable they represent. I expect that it is colored and neatly finished.

I also tell them that although x and x^2 look the similar, they are not the same creature and cannot be in the same cage together. It is always interesting to see what they can come up with in their pictures.
I will admit that this is cutesy, but sometimes, cutesy just works! :)
Sunday, July 6, 2014
Kahoot! is a Hoot!
Kahoot! can be played on a computer, a laptop, an iPad, or a cell phone. As long as you have access to an internet connection and web browser, you can play from anything. Here is a quick walk through of Kahoot! I took a lot of screen shots so you get a feel for the game part of the site. I was also in the preview mode, not the full game of the literal equations review/quiz that I had made. The cell phone is only on the side when you play a preview of a review/quiz.


Students are then prompted to enter a username. I know when I do this next year, I will assign the group names to the students. This was the most time consuming part. As students enter their username, it appears on the screen. When all of the students are entered, push the start now button and the review/quiz will begin.

The question comes up without choices to give students time to read it before the choices appear.


I usually don't talk about a website to this extent, but this is actually one that I am excited about and think it will be useful next year to switch things up and do something different.
Thursday, July 3, 2014
Mathematical Conversations
 Mathematical conversations are a technique that I learned over a year ago, but never put it into practice. This year I am going to give it a go and I am hoping that it helps some students solidify vocabulary and procedures.
The technique is pretty simple. The teacher writes a script that the students will read in partners or triads. The students then put on their best acting abilities and read the script with each other. The script should be read through at least twice and students should change roles. The script does not have to be long, but should be focusing on key vocabulary, procedures, or concepts that students aren't understanding.
After students are comfortable with the way a mathematical conversation should be in the class, they can try their hand at writing their own for the class to read or acted out by the authors. It is a great way to get writing happening in the math classroom! Student written or teacher written scripts could make a possible activity for a station. Several scripts as stations could be a review activity as well.
My first attempt at trying to write a mathematical conversation is below this paragraph. I picked the topic of subtracting integers because it is reviewed in the text and I know that this was hard for the kiddos last year. As Algebra students,
they have to be comfortable with the subtracting integers. My conversation is longer than what it should be. In reality, it should be less than a page. I just wanted to try and bring in some conceptual understanding too. I am also debating if I should go with the traditional rule of "add the opposite" or stick with the "keep, change, change" rule that I went with last year. For consistency, "keep, change, change" really is the better choice. If the conversation would be useful to you, you are welcome to it.
Tuesday, July 1, 2014
Definition Doctor


For the "Definition Doctor" technique, students use the words that they rated in their VKR. One student volunteers to be the "Definition Doctor" and another student chooses a vocabulary word from the list and asks the "Definition Doctor" to define and explain why the word is important to the lesson or unit of study. If the "Definition Doctor" is stuck, they may ask another classmate for a "second opinion" to get some help. After the definition and significance has been given, the student who chose the vocabulary word becomes the "Definition Doctor". Practice continues like his until all the words have been reviewed.
When I read this techniques, I loved that it asked students to make connections and put a value on the vocabulary. The word really is important to understanding the material! I also liked that the activity has flexibility to be a large group, small group, or pairs activity.
I wanted to make "Definition Doctor" feel more like a game, so my students would review all of the words. I can totally see them reviewing 2 or 3 words and then chatting for awhile until I came to see what they were doing or listen to their group. By putting the vocabulary onto cards, the technique had more of a game feel. If it was a game, then there is a start and a finish. The cards would need to be gone through before they could stop. It's not perfect, but better than just choosing off of a list. The cards also let me focus the practice to specific words because I can take out words I don't want my students to focus on.
The template that I used to make the cards is here. As always, if it will be useful to you, you are welcome to it!
Saturday, June 28, 2014
Frog Flippin' (Measures of Central Tendency)

Last year, I did an activity I called "Frog Flippin'". I have about 10 of the medium size version of these frogs. I asked the students to flip and measure the frog 10 times, record the data, calculate the mean, median, and mode of their frogs distances. I then asked them to add 30 cm to their longest jump to create an outlier. I found, at least in my experiments, the frogs were pretty consistent jumpers and didn't naturally create an outlier, so I made one exist. The students then examined what happened to the data with the outlier in it and we discussed what happened when it was taken out.
Next year, I want to add more data for analysis, even if it will take some more time. I am still giving this expansion some thought and tweaking but it is pretty well organized. To expand the project, I am going to add in additional sizes to the activity. By posing the question: "Which size frog goes the farthest?", I am hoping to intrigue the students enough that they want to know the answer themselves.
The main idea is that students will collect data for 10 flips for each frog in small groups picked by me. Students will then need to calculate the mean, median, and mode of the data. I want to open a discussion about how to pick the best measure of central tendency so that each size frog is represented most positively. Which measure of central tendency should be used? Will their chose vary by the size of the frog?
After this, I will ask if anyone is wondering anything about their data or the measures of central tendency. I am hoping someone will wonder if more data would change the results. I am also hoping that if there is an outlier, someone will question that as well. Students will then gather data from their peers and recalculate the measures of central tendency. Students are asked to make observations about what they are noticing. Then, we'll examine outliers and the role they play in skewing data.
The original activity and the activity that I have been developing are attached if you are interested!
Original Activity:
3 Sizes Activity:
Friday, June 27, 2014
123 Switch! (Game to Practice Adding/Subtraction Integers)

Tom has a hand made template that students drew in their notebooks. I see the value in that and would prefer that, but I know my kiddos and they need a game board. So I made a template for addition and subtraction. I am going to print them out on some fun colored paper and then glue them back to back. With some quick lamination, they should be ready for the next school year!


The first thing you do is pass out 7 cards to each player. The black cards are positive and the red are negative. The first player puts down a true equation based on the cards in their hand. If they can't, they need to select cards from the draw pile until they can.
The next player can change 1, 2 or 3 cards by placing a card on top of one already on the board with one from their hand. In the picture below, I could replace the 6 of diamonds with the six of hearts. I could replace the 9 of spades with a 7 of clubs. Then replace the 6 of diamonds with a 4 of diamonds and still have a true statement without changing the 3. I could also just replace all three cards. The goal is to be the first person to get rid of all of his/her cards.
The game becomes more challenging when you have to make subtraction equations. I like that the game is challenging and competitive enough to keep the students interest. Not to mention, it's a great way to practice!
Here are my templates for the game boards. I also made a direction sheet for the students.
Thursday, June 26, 2014
Product Race! (Product Rule of Expoents Game)

The game board is a basic square design and the first person to return to the start square is the winner. The students roll a die and move the number of spaces indicated on the die. Then, they pick a card and using the expression on the game board, multiply the two expressions together. If the student is correct and his/her peers agree, then the student may take one extra turn. If incorrect, another student takes their turn.
I recycled some old file folders by putting the game board into them. It fit really well. I then put the directions for playing the game on the front cover and snipped the corner that had the label. The final task will be to laminate the entire folder for durability. I am going to keep the cards separate from the boards in their own snack sized bags. I thought about duct taping them to the back of the folder, but I thought they would stack better without the bag of cards on the back of it.

The game board, directions, and cards are below if anyone would like them. I don't like that the word formatting changed all of the letters to capitals, but until I can figure out how to fix it, it will have to do.
** Update: Much thanks to Kayla who told be how to fix the letters. It was so simple! I should have figured it out. Nonetheless, I appreciate the assistance!
Wednesday, June 25, 2014
Zero!

The game is basically blackjack with the goal being to get 0, not 21. The red cards are negative and the black cards are positive. The student with the number closest to 0 when the cards are added is the winner of the round. Students calculate the absolute value of each of their round totals, then at the end of the game, they add up the absolute value column. The student with the number closest to zero, is the winner of the game. This sounds like a blast! I think my kiddos will love it and it reinforces addition of integers and absolute value all in one game!!
There is a link above to Julie's explanation of the game at "I Speak Math". Her direction and score sheets are there as well. I don't subscribe to Scribd, so I recreated the direction sheet and score sheet myself. It is basically what Julie has, but I added learning goals, supplies, an example on the score sheet, and a reminder to turn it in for credit. It is below if you'd like it.
Thursday, June 19, 2014
Practicing Expressions and Their Vocabulary
 | |||
| Opps! Should have had the "s" in coefficients in parentheses. |
With some thought, I came up with two different ideas. One of them is in the picture at the left. I had these numbers left over from when I was "The Mathematical Wonder" superhero for the day last school year. They got me thinking that I could have the kids make expressions and define the different parts of the expression to a partner. It wasn't a bad idea, but I didn't feel like I was stretching them. Then, brilliance struck and I thought, "what if their expression had to meet specific criteria?". That would challenge them to create an expression and understand the vocabulary words!
I created some simple task cards which you can download below. If the dollar store is out of the numbers, I am going to use the plastic bottle tops that I've collected and my trusty sharpie to make my own set of numbers.
I wanted something else to practice with that was active. So I thought about the Kagan cooperative group technique called "Mix-'n'-Match". I have had good success with this in the past. If you're not familiar, students each have a card and have to go and tell someone the answer to what is on the card (or explain something to another student). So student A explains to student B, then Student B explains to student A what was on their card. The two students then swap cards and go talk to someone new. This goes on for 5 minutes or so. I like it because there is a lot of practice happening in a short time frame and it gets them up and moving.
After I made the cards, I thought that they would work well for an inside-outside circle activity. For this activity, students make two circles with one circle inside of the other. Students face each other so that one student on the outside circle is facing a student from the inside circle. They talk about the cards, swap them, and then either the inside or outside circle moves while the other stands still. There are lots of variations on this activity, so do what works for you. Below are the cards that I made.
Tuesday, June 17, 2014
Stations for Real Numbers
Well, school has barely ended and I am already working on next year. There will be no rest for me this summer as I get ready to have a blended, leaning heavily towards flipped, Algebra classroom next year. Making the videos is not what I think will be the most time consuming! What is taking longer is figuring out how to use all of class time that I now have! In some cases, it is narrowing down the activities that I have and figuring out what will be the best use of the class time. In other cases it is finding the activity or tweaking something to better fit the topic.
The first lesson that we do in the Saxon Algebra I (2009) text is about classifying real numbers. I like the calk walk activity that I did last year, but I want to use that to review with the following week. I want to spend the class time after the first video actually practicing classifying the numbers. For some reason, this needs more practice than I usually give it. So I decided to set up some stations and practice and practice and practice classifying numbers in the real number system.
Here are the stations (I'm still working on the names)...

In this station students will be asked to sort 20 popsicle sticks with different numbers on them. The white cups are the classifications of natural, whole, integer, rational, and irrational. The green cups have multiple groups. I made the categories of irrational/real, rational/real, rational/integer/real, rational/integer/whole/natural/real, and integer/whole/natural/real. The first task at this station will be to sort the popsicle sticks into any cup that would classify the numbers. They will then write down 3 observations about how the numbers were sorted. The second task will be to use only the white cups and decide which is the best classification for each number on the popsicle stick. They will then write down 3 observations about this task.
For this station, students play a traditional game of concentration (or memory), but they get a match if the two numbers flipped are from the same set of numbers and they can identify the set. Students can't use the same set, two times in a row. So for example, if student 1 made a match using rational numbers as the classification, then he/she couldn't make a match on their next term using rational numbers. He/she would need to use another set. I am also not letting them use real numbers for any of the classifications. Also, all of the cards have a match, but depending on what set students use the last ones may be challenging to classify.
In this station, students will be asked to sort the real life situations into the best set of real numbers. Students will need to explain why they have picked that particular category for the situation. The trickiest are the circular questions. Students tend to classify those as rational when it should be irrational. All of my examples came directly from my textbook.
This is a basic game of tic-tac-toe with a twist: To win you need to have 3 of the same sets! Students can pick their own numbers and classify them into any set that the number belongs. Another student can block them by putting another number in a box and classifying it in a different set. Some strategy will need to be used and really thinking about the sets that a number can belong. Students may classify numbers as real in this game. I'm going to monitor it closely and see if that is all that they are using. I can always change the rules! :)

The last station that I am going to have the kiddos do is a real number carousel that is free on Teachers Pay Teachers. I am going to have this set up for them to work on while they are waiting for a station or when they finish all of the stations. Hopefully that will help with down time.
Sorry about the long post. If you made it all the way to the end, then I hope that you found something useful that will make next year better! I would love to hear how any of the activities goes for you. I will update after I try them in the fall!
The first lesson that we do in the Saxon Algebra I (2009) text is about classifying real numbers. I like the calk walk activity that I did last year, but I want to use that to review with the following week. I want to spend the class time after the first video actually practicing classifying the numbers. For some reason, this needs more practice than I usually give it. So I decided to set up some stations and practice and practice and practice classifying numbers in the real number system.
Here are the stations (I'm still working on the names)...
Station 1: Popsicle Stick Sort

In this station students will be asked to sort 20 popsicle sticks with different numbers on them. The white cups are the classifications of natural, whole, integer, rational, and irrational. The green cups have multiple groups. I made the categories of irrational/real, rational/real, rational/integer/real, rational/integer/whole/natural/real, and integer/whole/natural/real. The first task at this station will be to sort the popsicle sticks into any cup that would classify the numbers. They will then write down 3 observations about how the numbers were sorted. The second task will be to use only the white cups and decide which is the best classification for each number on the popsicle stick. They will then write down 3 observations about this task.
Station 2: Real Numbers Concentration
For this station, students play a traditional game of concentration (or memory), but they get a match if the two numbers flipped are from the same set of numbers and they can identify the set. Students can't use the same set, two times in a row. So for example, if student 1 made a match using rational numbers as the classification, then he/she couldn't make a match on their next term using rational numbers. He/she would need to use another set. I am also not letting them use real numbers for any of the classifications. Also, all of the cards have a match, but depending on what set students use the last ones may be challenging to classify.
Station 3: Real Life, Real Numbers
In this station, students will be asked to sort the real life situations into the best set of real numbers. Students will need to explain why they have picked that particular category for the situation. The trickiest are the circular questions. Students tend to classify those as rational when it should be irrational. All of my examples came directly from my textbook.
Station 4: Tic-Tac-Toe: Real Number Style!
This is a basic game of tic-tac-toe with a twist: To win you need to have 3 of the same sets! Students can pick their own numbers and classify them into any set that the number belongs. Another student can block them by putting another number in a box and classifying it in a different set. Some strategy will need to be used and really thinking about the sets that a number can belong. Students may classify numbers as real in this game. I'm going to monitor it closely and see if that is all that they are using. I can always change the rules! :)
Station 5: Real Number Carousel
The last station that I am going to have the kiddos do is a real number carousel that is free on Teachers Pay Teachers. I am going to have this set up for them to work on while they are waiting for a station or when they finish all of the stations. Hopefully that will help with down time.
Sorry about the long post. If you made it all the way to the end, then I hope that you found something useful that will make next year better! I would love to hear how any of the activities goes for you. I will update after I try them in the fall!
Subscribe to:
Posts (Atom)